What is Google Tag Manager?
Google Tag Manager (GTM) makes it really easy to add different scripts to your page. The most common scripts that are used are analytics (Google Analytics) and remarketing tags (Facebook Pixel, Adwords Remarketing Pixel, etc.) Google Tag Manager makes working with code nice and easy because you only have to install it once on your website. All the other code snippets (tags) get put on the site through Google Tag Manager.
Get your account at tagmanager.google.com if you don’t already have one.
What is the Facebook Pixel?
The most basic function of the Facebook pixel is to track audiences. Whenever someone lands on your website, Facebook will tag them. This means that you can then use their advertising platform to target the exact same people that visited your website.
Installing GTM
The first step is to Install the Google Tag Manager code snippet onto your site. There are 2 parts to the code snippet. One goes in the header between the <head></head> section and the other in the <body> before the closing tag </body>. Sometimes your theme has a spot to do this if you don’t want to use a plugin.
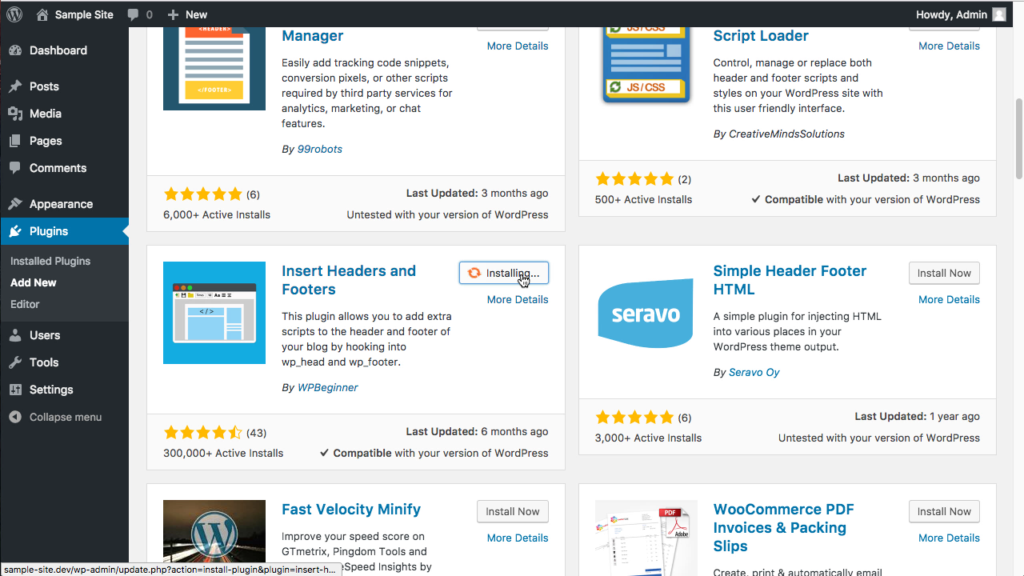
Install the Insert Headers and Footers plugin.
- Go to Plugins > Add New > search for Insert Headers and Footers plugin by WPBegginer > Install and Activate.
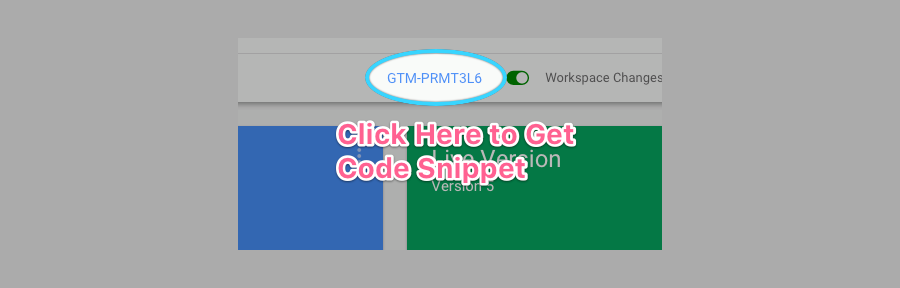
Once the plugin is installed we can grab the code from Google Tag Manager.
- Go to Google Tag Manager and click on the Container ID to pull up the code snippets.
- Go back to WordPress in Settings > Insert Headers and Footers > Paste the top code into the <head> section and the bottom code into the <body> section.
VIOLA! Google Tag Manager is now installed on our website!
Installing The Facebook Pixel
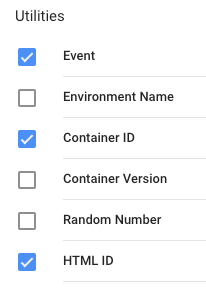
- The first thing we will want to do is click on Variables on the left hand. > Click Configure > and enable “HTML ID” and “Container ID” from the options. (I like to also enable all click and form variables for future use.)
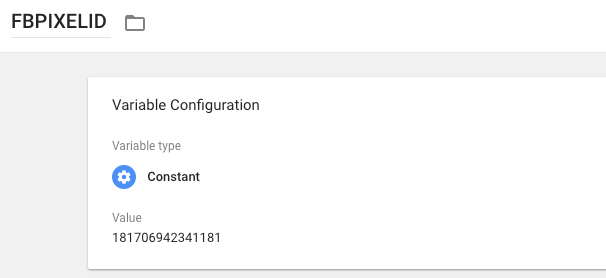
- The next thing we want to do is create a constant variable for our Facebook Pixel ID.
- Go to Variables > all the way down at the bottom under “User-defined Variables” click NEW > Title the Variable “FBPIXELID”
- Click Learn More > Choose “Constant” > Input the Facebook Pixel ID into the field. > Click Save
- Now, it’s time to make the tag.
- Go to “Tags” on the left-hand side.
- Click “NEW” > title the tag “Facebook Base Pixel” > Choose “Custom HTML”
- Insert the following Code:
<script> var gtm = google_tag_manager[{{Container ID}}]; try { !function(f,b,e,v,n,t,s){if(f.fbq)return;n=f.fbq=function(){n.callMethod? n.callMethod.apply(n,arguments):n.queue.push(arguments)};if(!f._fbq)f._fbq=n; n.push=n;n.loaded=!0;n.version=’2.0′;n.queue=[];t=b.createElement(e);t.async=!0; t.src=v;s=b.getElementsByTagName(e)[0];s.parentNode.insertBefore(t,s)}(window, document,’script’,’//connect.facebook.net/en_US/fbevents.js’);
fbq(‘init’, “{{FBPIXELID}}”); fbq(‘track’, “PageView”); gtm.onHtmlSuccess({{HTML ID}}); } catch(e) { gtm.onHtmlFailure({{HTML ID}}); }</script><noscript><img height=”1″ width=”1″ style=”display:none”src=”https://www.facebook.com/tr?id={{FBPIXELID}}&ev=PageView&noscript=1″/></noscript>
*Because we used a constant variable, this is the only piece of code that we need. The above code references the FBPIXELID constant we created.
- Choose to fire on all pages > Save.
![]()
The Facebook Pixel is now Successfully installed on our website through Google Tag Manager.